Predictions database
A predictions database is a Timescale database that stores the output of a vision model: everything the model detected on an image. It is not a standalone store — it always belongs to a main database, which holds the inspection metadata and the references that point into it.
What it is for
When a vision model inspects an image, two very different kinds of data come out of it:
- The inspection itself — when it happened, on which line, which product, which model version. This is regular time-series data and belongs in the main database.
- The predictions — the bounding boxes, masks and keypoints the model detected, each with its label and confidence. There can be many per image, each with its own geometry.
Predictions do not fit the shape of a time-series measurement, so they are kept in their own database. The main database stores a reference, and the platform resolves that reference to the predictions when they are needed.
Splitting them this way means:
- The main database stays lean and fast for the queries it is good at, such as dashboards and trends over inspection metadata.
- Predictions can be queried on their own structure — for example, "every inspection where the model found a scratch with confidence above 0.9".
The main consumer is the iOPTIQ application, which uses the predictions to draw detections on each inspection image and to filter the inspection overview by what was found. See the iOPTIQ Overview for what that looks like in practice.
A predictions database must be of type Timescale. Influx is not an option.
Filtering inspections on their predictions relies on the Timescale schema, so a predictions database on Influx cannot serve those queries.
Create a predictions database
A predictions database is created like any other storage, through the Add Capture Storage wizard — see Databases & Retention Policies for the full flow. Two things matter here:
- In General, set the Type to Timescale.
- In Retention(s), add a retention policy, the same way you would for a main database.
Link it to a main database
The main database only knows where its predictions live once you link the two. The link is made on a retention policy of the main database, not on the database as a whole.
- Open Storage Hub and select your main database.
- Go to the Settings tab.
- Find the retention policy that the vision data is written to, in the Retentions table.
- In the Link to Predictions DB column, select your predictions database.
- Save.
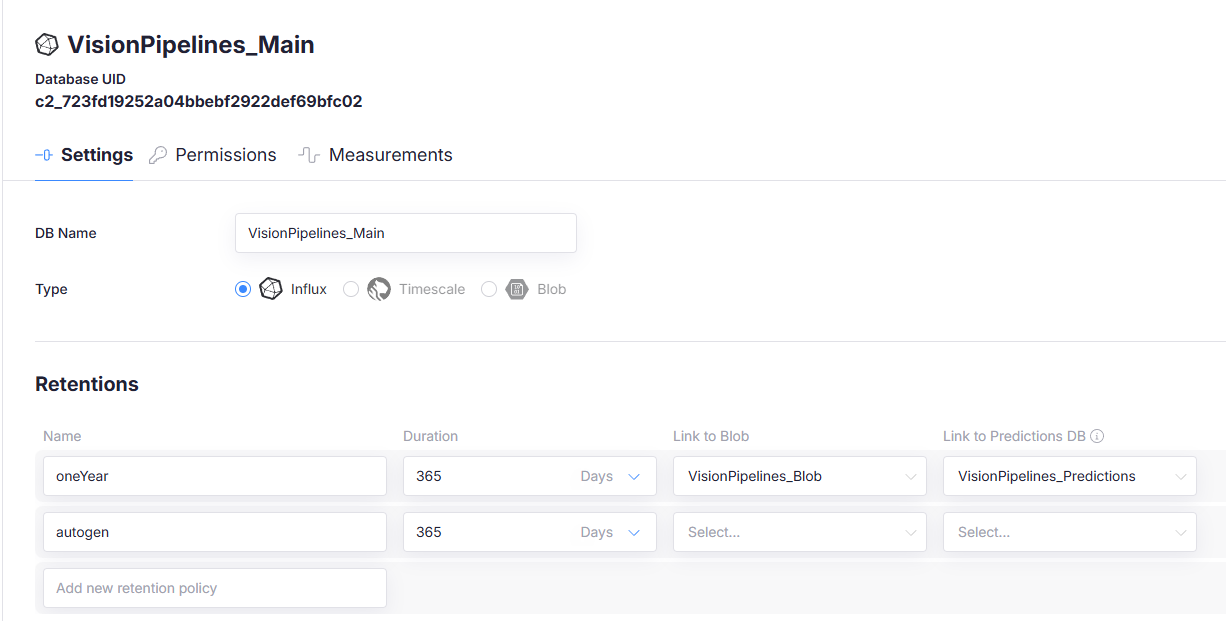
In the example above, the main database VisionPipelines_Main has its oneYear retention linked to both a blob database (for the images) and a predictions database. The autogen retention is left unlinked — a database can have several retention policies, and each one carries its own links.
Set the link on the retention policy that the data actually arrives in — the same policy that is selected on the edge device. If the device writes to a retention that has no predictions link, the predictions have nowhere to go.
The Link to Blob column in the same table works the same way and is usually filled in alongside it: for a vision setup, the images go to a blob database and the predictions to the predictions database. See Databases & Retention Policies for that column.
Required setting on the edge device
Linking the databases is only half of it. The device that logs the data also has to be configured to pass the predictions along, and this part is easy to miss because nothing fails visibly when it is wrong.
Predictions arrive inside the payload as a nested object — captureVisionPredictions — that sits outside the tags and fields. The collector ignores objects it has not been told about, so unless you declare it, it is silently dropped and your predictions database stays empty.
Declare it in the collector configuration of the device, in the JSON editor, by adding it to the additionalProperties tag of collectorSettings:
[
  {
    "id": 1,
    "propertyName": "captureVisionPredictions"
  }
]
The full walkthrough, together with how the vision object itself is logged, is on the Vision Pipeline Setup page. For the general mechanism behind additional properties and the rules that apply to them, see Capture Object With additional properties.
If iOPTIQ shows your inspection images but no detections on them, check this setting before anything else. A missing additionalProperties entry produces exactly that symptom: the images and metadata arrive normally, and only the predictions are absent.
Related pages
- Databases & Retention Policies — creating storage and managing retention policies
- Vision Pipeline Setup — the full setup of a vision pipeline, end to end
- Capture Object With additional properties — how additional properties work on the edge