Replicators
If you don't see this page, you need to enable the Advanced options toggle in the top right.
Replicators forward data generated by Capture to an external system (for example an MQTT broker, Redis, or the internal OPC UA server). They are defined once here. The variables that send data to the replicators are configured on the Collector/Connection/Measurements page.
Replicator list
The left pane shows all configured replicators.
- Select a replicator to edit its settings.
- The list shows the Replicator name and Type.
In the list, you can:
-
Add a replicator: Select the + button to create a new replicator.
-
Duplicate a replicator: Use the row context menu, select Duplicate.
-
Delete a replicator: Use the row context menu, select Delete.
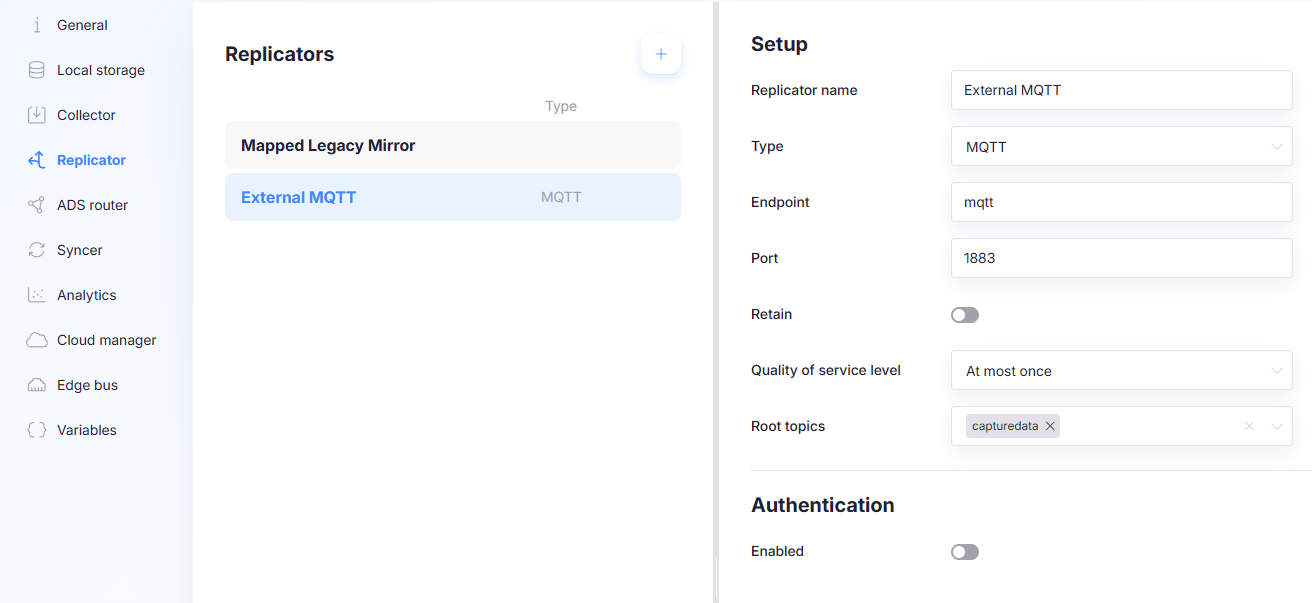
Setup
The right pane contains the configuration for the selected replicator.
- Replicator name: Human-readable name for the replicator. This is the name shown when selecting replicators elsewhere (for example in variable settings).
- Type: Selects the target system the replicator writes to. Available fields change based on type.
- Endpoint: Target host or address of the external system.
- Port: Target port of the external system.
- Authentication: Authentication settings are optional and depend on the selected type.
- Enabled: Turns authentication on or off.
- Username / Password: Credentials used when authentication is enabled.
Type-specific options
MQTT replicator
- Retain: When enabled, MQTT messages are published with the retain flag.
- Quality of service level (QoS): Sets the MQTT QoS level used for publishing.
- Root topics: One or more root topics under which Capture publishes data.
Redis replicator
Redis replicators require only the standard Setup fields (and authentication when applicable).
OPC UA replicator
The OPC UA replicator re-exposes data collected by Capture Edge as a live OPC UA server. Downstream systems — SCADA, HMI, historians, or other OPC UA clients — can connect to this server and subscribe to the same variables Capture Edge is collecting, without having direct access to the original data sources.
Unlike MQTT or Redis replicators — which push data to an external system — the OPC UA replicator hosts a server. The Endpoint field controls the bind address of the server, and Port is the port on which it listens.
How it works
Data sources → Capture Edge Collector → OPC UA Mirror Server ← OPC UA Client
- Capture Edge collects data from one or more sources (OPC UA, ADS, MQTT, ...).
- Each collected data point is forwarded to the OPC UA mirror.
- The mirror maintains an in-memory OPC UA node tree and updates node values and timestamps on every incoming point.
- OPC UA clients subscribe to nodes on the mirror server and receive change notifications.
The mirror server starts automatically when a replicator of type OPC UA is configured.
Connecting to the server
Use the following endpoint URL format in your OPC UA client:
opc.tcp://<gateway-ip>:<port>/
For example, if the gateway is at 192.168.1.50 and the port is 4840:
opc.tcp://192.168.1.50:4840/
Configuration
| Field | Description |
|---|---|
| Port | The TCP port the OPC UA server listens on. The standard OPC UA port is 4840. |
| Endpoint | Bind address for the server. Fixed at 0.0.0.0 (all interfaces); cannot be changed via the frontend. |
| Authentication → Enabled | When enabled, OPC UA clients must provide a username and password to connect. Enabling this disables anonymous access. |
| Authentication → Username | Username clients must use. Defaults to Capture if not set but a password is configured. |
| Authentication → Password | Password clients must use. |
Node tree
By default the mirror generates OPC UA nodes automatically from the collected variables. Nodes are created lazily — they appear in the address space the first time a value is received for that variable.
Node names follow this pattern:
| Variable type | Node key pattern |
|---|---|
| Normal variable | {connectionName}_{measurement}_{variableName} |
| Tag / global tag | {connectionName}_Tags_{tagName} |
| Condition trigger | {connectionName}_ConditionTriggers_{name} |
| ADS struct member | {connectionName}_{measurement}_{struct}[{index}]_{field} |
For example, a variable named Temperature in measurement Sensors on connection PLC1 is available as the node PLC1_Sensors_Temperature.
Custom address space (NodeSet)
For advanced deployments you can upload a NodeSet2 XML file via the config editor. The config editor handles the base64 encoding automatically. The mirror will load the nodeset and map incoming data points to nodes via ModelBindings. If the nodeset cannot be parsed, the mirror falls back to auto-generated mode and reports an issue.
Example: minimal NodeSet2 XML
The file below defines a MachineData folder in a custom namespace with two variable nodes (Temperature and Pressure):
<?xml version="1.0" encoding="utf-8"?>
<UANodeSet xmlns="http://opcfoundation.org/UA/2011/03/UANodeSet.xsd">
  <NamespaceUris>
    <Uri>urn:capture:mirror:example</Uri>
  </NamespaceUris>
  <Aliases>
    <Alias Alias="Double">i=11</Alias>
    <Alias Alias="Organizes">i=35</Alias>
    <Alias Alias="HasComponent">i=47</Alias>
    <Alias Alias="HasTypeDefinition">i=40</Alias>
    <Alias Alias="FolderType">i=61</Alias>
    <Alias Alias="BaseDataVariableType">i=63</Alias>
  </Aliases>
  <!-- Top-level folder -->
  <UAObject NodeId="ns=1;i=1000" BrowseName="1:MachineData">
    <DisplayName>MachineData</DisplayName>
    <References>
      <Reference ReferenceType="HasTypeDefinition">FolderType</Reference>
      <!-- Attach to the OPC UA Objects folder -->
      <Reference ReferenceType="Organizes" IsForward="false">i=85</Reference>
    </References>
  </UAObject>
  <!-- Variable: Temperature -->
  <UAVariable NodeId="ns=1;i=1001" BrowseName="1:Temperature" DataType="Double">
    <DisplayName>Temperature</DisplayName>
    <References>
      <Reference ReferenceType="HasTypeDefinition">BaseDataVariableType</Reference>
      <Reference ReferenceType="HasComponent" IsForward="false">ns=1;i=1000</Reference>
    </References>
  </UAVariable>
  <!-- Variable: Pressure -->
  <UAVariable NodeId="ns=1;i=1002" BrowseName="1:Pressure" DataType="Double">
    <DisplayName>Pressure</DisplayName>
    <References>
      <Reference ReferenceType="HasTypeDefinition">BaseDataVariableType</Reference>
      <Reference ReferenceType="HasComponent" IsForward="false">ns=1;i=1000</Reference>
    </References>
  </UAVariable>
</UANodeSet>
Example: ModelBindings
After uploading the NodeSet2 file, configure ModelBindings in the config editor to map each Capture Edge variable to a node. The Key follows the same pattern as the auto-generated node keys:
[
  { "Key": "PLC1_Sensors_Temperature", "NodeId": "ns=1;i=1001" },
  { "Key": "PLC1_Sensors_Pressure",    "NodeId": "ns=1;i=1002" }
]
In this example, the variable Temperature from measurement Sensors on connection PLC1 is mapped to the custom node ns=1;i=1001, and Pressure is mapped to ns=1;i=1002. Any variable with no matching binding is silently ignored (the custom node retains its last value).
Security policies
By default the mirror accepts any OPC UA security policy. To restrict the allowed policies, configure SecurityPolicies via the config editor. Each entry is a mode-algorithm string:
SignAndEncrypt-Basic256Sha256
Sign-Basic256Sha256
NoSecurity
| Token | Accepted values |
|---|---|
mode | None, Sign, SignAndEncrypt |
algorithm | Basic256Sha256, Auto, Basic128Rsa15Basic256 |
Use NoSecurity as a shorthand for None mode with no algorithm (no security, no encryption).
Basic128Rsa15 and Basic256 are deprecated and considered insecure. Use Basic256Sha256 or Auto for new deployments.
Allowing NoSecurity means data is transmitted unencrypted. Use only on isolated networks.
Certificate-based client authentication
To restrict access to specific clients using X.509 certificates, upload client certificates via the config editor. Adding at least one valid client certificate disables anonymous access automatically.
| Field | Description |
|---|---|
| Certificate file | The X.509 certificate file of the allowed client (DER or PEM). |
| Password | Certificate password, if the certificate is password-protected. |
| Description | Human-readable label for this entry (used in logs). |
Per-variable settings
In the variable's additional settings overlay (see Measurements), two OPC UA-specific options are available when a variable is routed to an OPC UA replicator:
| Option | Description |
|---|---|
| Write | When enabled, OPC UA clients can write a value to this node. Capture forwards the write to the source connection. Only supported for connection types that support writes. |
| Historize count | Number of historical data points to keep for this node on the OPC UA server. When set, clients can request historical values via OPC UA History Read. Set to 0 to keep only the latest value (default). |
Debug mode
Set the environment variable CAPTURE_OPCUA_MIRROR_DEBUG=true to enable verbose logging for the OPC UA mirror. This activates server state-change events, session activation/closing events, per-request validation logging, and a diagnostics dump every 60 seconds.
Debug mode increases log volume significantly. Use only for troubleshooting, not in production.
Troubleshooting
| Symptom | Likely cause | Resolution |
|---|---|---|
Mirror reports issue OPCUA_MIRROR on startup | NodeSet2 XML is invalid | Check the logs for the parse error. Re-upload the NodeSet2 XML via the config editor. The mirror will fall back to auto-generated mode. |
| Clients cannot connect | Wrong port, or server failed to start | Check the collector logs for Failed to start Opc ua server. Verify the configured Port is not already in use. |
| Clients are rejected with a security error | Security policy mismatch | Ensure the client's security policy matches one of the configured SecurityPolicies, or remove SecurityPolicies to allow all. |
| Nodes appear but values never update | ModelBindings mapping is missing or incorrect | In nodeset mode, verify that all variables have a corresponding entry in ModelBindings. |
| Anonymous access denied | A username/password or client certificate was configured | Configure credentials in the connecting OPC UA client, or remove the Password and any client certificates via the config editor to re-enable anonymous access. |
Where replicators are used
Replicators do nothing by themselves until variables are configured to send data to them.
Replicator selection happens in variable additional settings:
- Select which replicators receive a variable’s values.
- Configure direction per replicator:
- Read: values produced by the variable are sent to the replicator. Connection source (e.g. PLC) → Capture Edge → Replicator
- Write: the variable can be written from the replicator (only supported for connection types that support writes). Replicator → Capture Edge → Connection source (e.g. PLC)