Configuration
Configure an Ioptiq Project
When iOPTIQ is opened without any prior configuration, the interface will appear empty. No inspections or image data will be shown until at least one project has been created and configured.
This guide explains step-by-step how to create your first project.
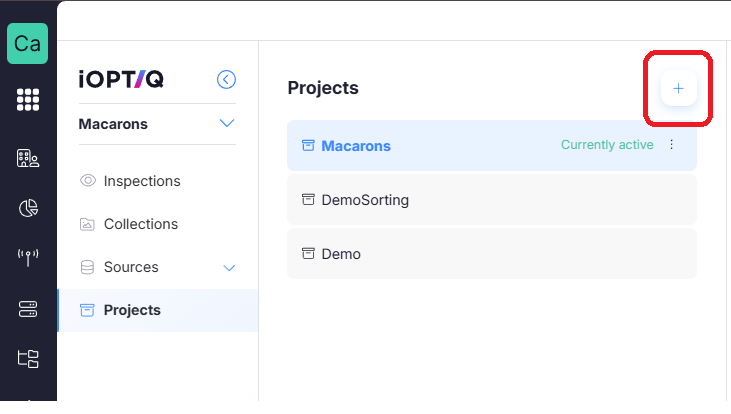
Step 1 — Create a New Project
-
Launch the iOPTIQ application.
-
In the left-side navigation menu, click Projects.
-
In the top-right corner of the Projects page, click the “+” (Add Project) icon.
-
A configuration popup window will open.
Step 2 — Configure the Project
In the popup, complete the required fields:
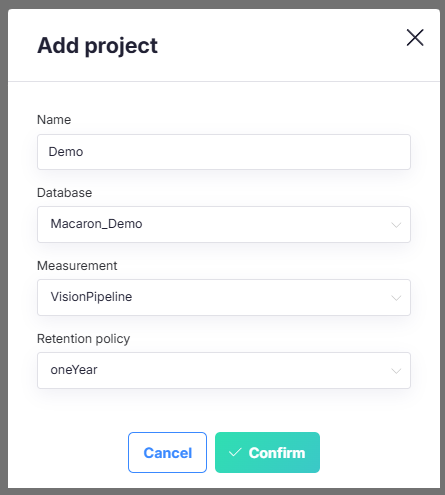
1. Project Name
Enter a clear and relevant name for your project.
This name will appear in the side navigation and should reflect what project information / model will be shown Use a consistent naming convention across projects.
2. Capture Database
Select the correct Capture database that stores your image and prediction data.
This database must contain:
- Image references (blob storage links)
- Prediction outputs (e.g., bounding boxes, masks, keypoints)
Optional it contains:
- Associated metadata fields
- A unique ID field for all images
ONLY INFLUX DATABASES SUPPORTED - If the wrong database is selected, no inspections will appear.
3. Measurement & Retention Policy
Select the correct Measurement & Retention policy linked to your data source.
This ensures:
- The correct data table is used
- The project connects to the proper measurement stream
- Data retention rules are correctly applied
Make sure this matches the configuration defined in Capture for your vision pipeline.
4. Save the Project
Confirm the pop-up & save the project.
The project will now appear in the Projects overview.
Step 3 — Upload a Config
Now that your project is connected to the correct Capture database, the next step is defining how database fields are mapped to visual elements inside iOPTIQ.
This configuration determines:
- Which column contains the image reference
- Which column contains the detection results
- Which metadata fields should be shown
- Which detections (bounding boxes, masks, keypoints) should be visualized
- Which colors and labels are used in the UI
Currently, this initial configuration can only be done by uploading a JSON configuration file to the project. However, It is possible to edit most of these configuration settings in the Sources Tab, like:
- Enabling / disabling sources
- Changing the reference names of the annotations & images fields
- Enabling / disabling annotations
- Enabling / disabling metadata
1. Download the Template
- Go to Projects
- Select your project
- Click the “Need a template” link
This will download an example JSON configuration file.
You must modify this file according to your database schema and detection labels.
Below is an example configuration template:
{
    "metadata": [
        {
            "label": "model_id",
            "field": "vision_pipelines_model_id"
        }
    ],
    "sources": [
        {
            "image_field_name": "vision_pipelines_image_cloud",
            "annotations_field_name": "vision_pipelines_detections",
            "inspection_id_field_name": "",
            "bounding_boxes": [
                {
                    "label": "openLid",
                    "color": "#302c60",
                    "enabled": true
                }
            ],
            "keypoints": [],
            "masks": []
        }
    ]
}
2. Structure of the configuration
The configuration consists of two main sections:
metadatasources
Metadata Section
"metadata": [
    {
        "label": "model_id",
        "field": "vision_pipelines_model_id"
    }
]
Defines which database columns should be shown as metadata in the iOPTIQ interface.
Metadata fields appear:
- In the inspection detail view
- In table view columns
- As filterable fields
label
- Display name in the UI
- This is what the end user will see
field
- Exact column name in the Capture database
- Must match the column in the table exactly
You can define multiple metadata fields by adding additional objects to the array.
Sources Section
"sources": [
    {
        ...
    }
]
The sources array defines how image data and prediction data are retrieved and visualized.
You can define multiple sources by adding additional objects to the array.
Source-Level Fields
image_field_name
- Database column that contains the image reference (blob storage path)
- Required for displaying images in iOPTIQ
- Must match the exact column name in Capture
annotations_field_name
- Database column that contains the detection JSON (COCO-style predictions)
- Required to display bounding boxes, masks, or keypoints
- Must match the exact column name
If incorrect, no overlays will appear.
inspection_id_field_name
- Optional field
- Used when multiple images belong to a single inspection ID
- Allows grouping images together in the interface
Leave empty if not used.
Detection Visualization Types
The following sections define which detection types are shown and how they are styled.
You can define multiple detections by adding additional objects to the array.
"bounding_boxes": [
    {
        "label": "openLid",
        "color": "#302c60",
        "enabled": true
    }
]
Defines object detection classes that should be visualized as bounding boxes.
label
- Must match the class name inside the detection JSON
- Case-sensitive
- If it does not match exactly, the detection will not appear
color
- Hex color code
- Determines the color of the bounding box in the UI
- Format must be
#RRGGBB
enabled
true→ Detection is visible in iOPTIQfalse→ Detection is hidden but still available in the data
{
    "label": "Broken",
    "color": "#ff0000",
    "enabled": true
}
Each class must be explicitly defined if you want it visible.
Keypoints"keypoints": [
{
"label": "joint_1",
"color": "#00ff00",
"enabled": true
}]
Structure is identical to bounding_boxes:
Leave empty if not used.
Masks"masks": [
{
"label": "SegmentationClass",
"color": "#ffaa00",
"enabled": true
}
]
Structure is identical to bounding boxes:
Leave empty if not used.
2. Validation
- Column names must exactly match the Capture database schema.
- Detection
labelvalues must exactly match the model output. - Colors must be valid hex codes.
- Invalid JSON formatting will prevent the configuration from loading.
3. Upload
After modifying the template:
- Save the file as
.json - Upload it to the selected project
- Confirm the upload
Once uploaded successfully:
- Images will load from the defined column
- Detections will be visualized
- Metadata fields will become available in filters and table view