RetroCapture User Guide
RetroCapture is a tool that helps you move data from offline devices (loggers) to the Capture Cloud. It replaces the old "Service Tool".
Think of it as a bridge: it takes data from a machine that doesn't have internet access to your current/local device and uploads it to the cloud for you.
RetroCapture is a "standalone" app. This means you don't need to install anything else to open it, but the file size is a bit large because it includes everything it needs to run.
🚀 Quick Navigation: What do you want to do?
Select the scenario that fits your current situation:
- I am connected to the device and want to upload data to the cloud NOW. (Requires Internet)
- I have a database on my local device and want to upload data to the cloud NOW. (Requires Internet)
- I am connected to the device, but I want to save the data to a file and upload it LATER. (No Internet required on site)
- I save a backup file manually and I want to upload it to the cloud.
- I need to get a License file.
The Launcher (First Steps)
When you start the RetroCapture executable, you will see the Launcher first.
- Database Engine: You need a database engine installed on your device to read the data. (Skip this if you already have Influx/Timescale installed)
- If your system uses InfluxDB, click
Install InfluxDB. - If your system uses TimescaleDB (Windows only), click
Install TimescaleDB.
- If your system uses InfluxDB, click
- Start the Tool: Click Open RetroCapture UI to begin.
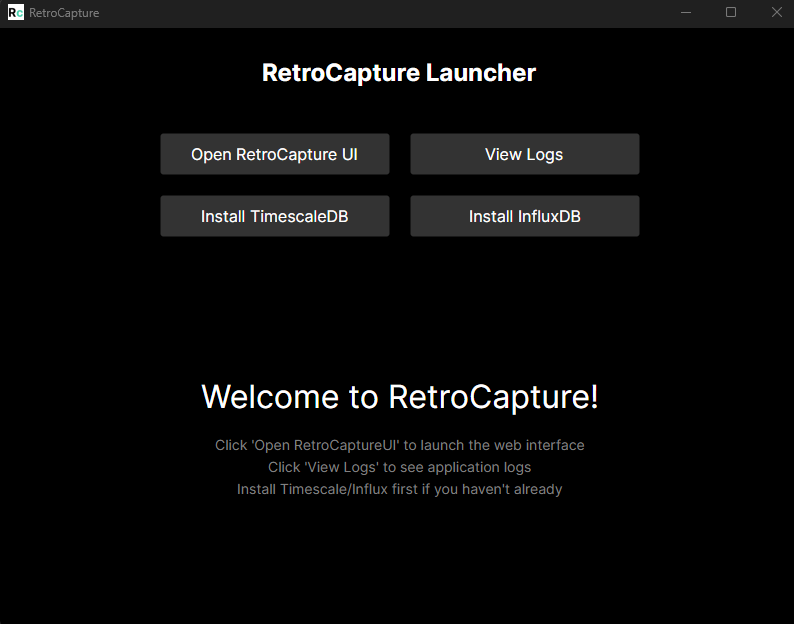
When you close RetroCapture, it asks if you want to Keep or Clean the temporary files.
- Left Button (Keep): Saves your settings and current data for next time.
- Right Button (Clean): Deletes everything so you start fresh next time.
Scenario 1: Live Syncing
Use this if: You have a network connection to the offline device (for example Ethernet or Wi‑Fi) and your laptop has internet access.
Or: You have a local database and you want to sync it now.
Step 1: Select Mode
On the RetroCapture Home Screen, click Live Syncing From Database.
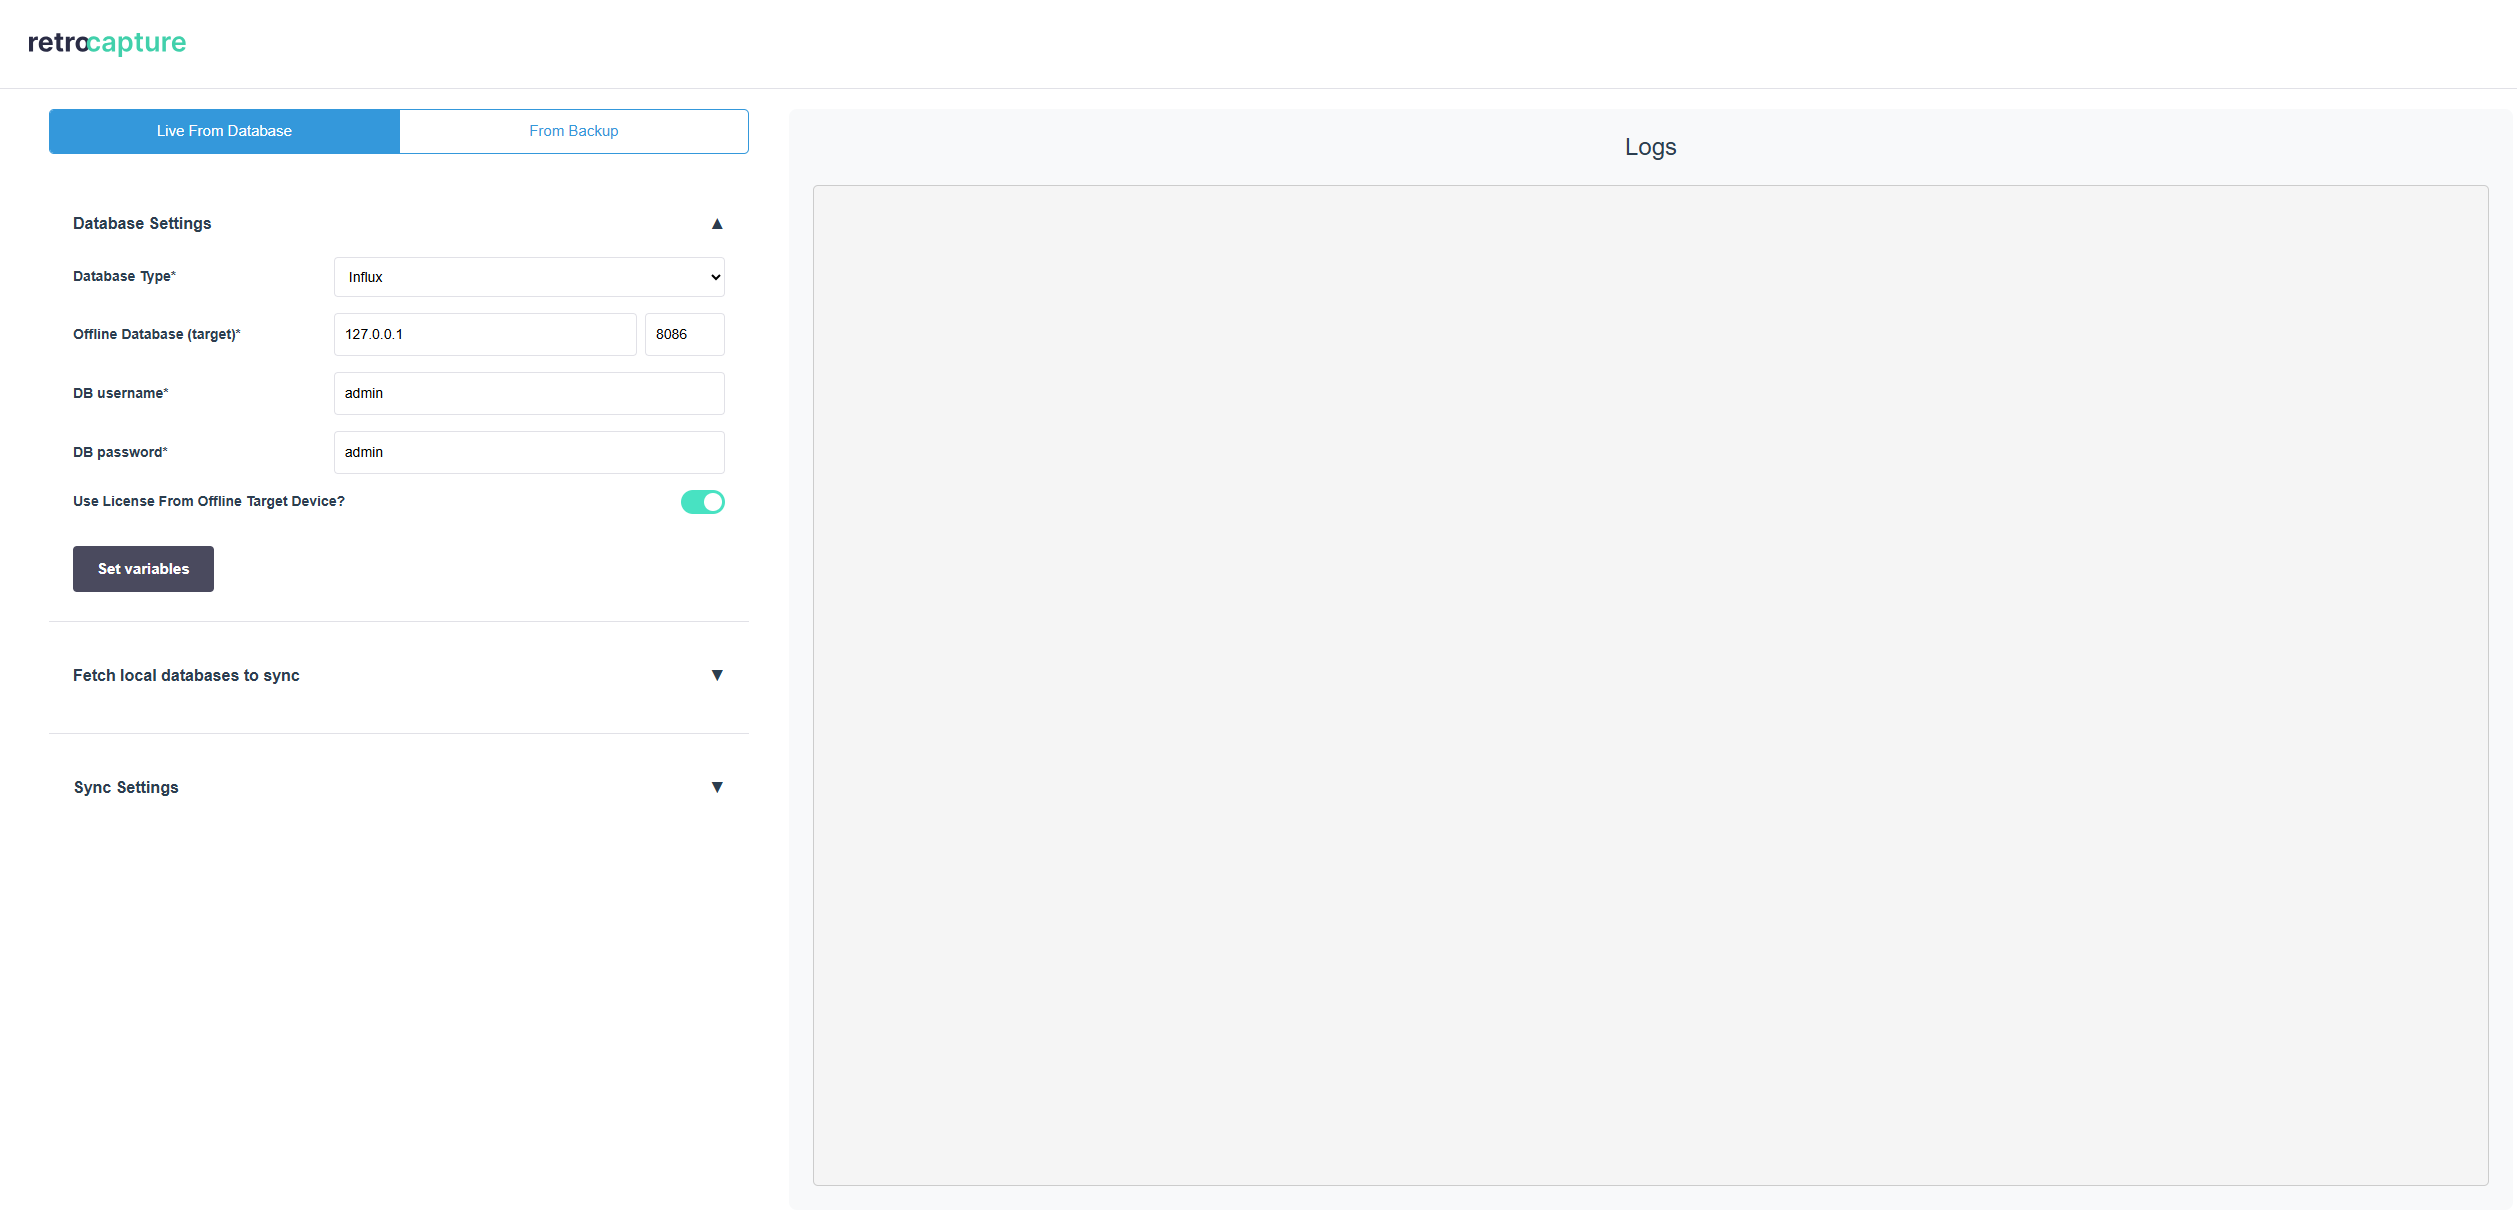
Step 2: Connect to the Machine
You need to tell RetroCapture where the data is coming from.
- Database Type: Choose
InfluxDborTimescaleDb(depending on your device). - Address: Enter the IP address of the device and the port (usually
8086for Influx or5432for Timescale). (See hint for more info) - Username & Password: Enter the database credentials.
- License: Check the box Use License From Offline Target Device. (See hint for more info)
- Click Set Variables.
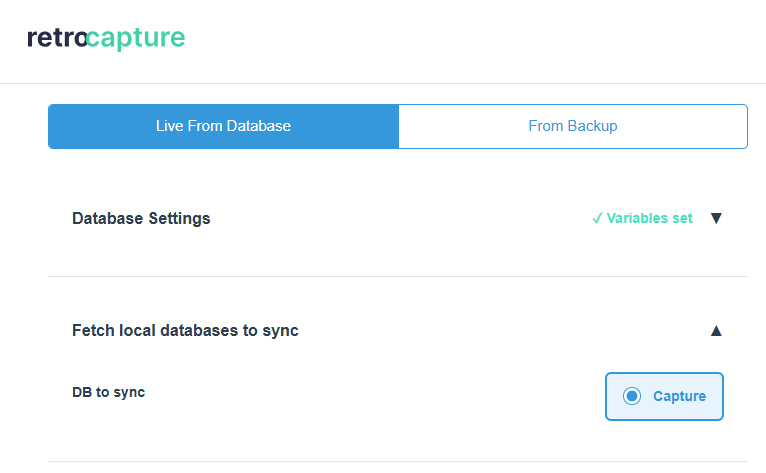
If successful, you will see a list of databases. Select the one you want to sync.
- Offline device (logger)
- This local device
Address: e.g. 192.168.1.x
License: Check this box and we will pull the license from this device which saves you effort later.
Address: this is always 127.0.0.1
License: If you have Capture.Edge on your local device, check this box and save effort later. If you have no Capture.Edge running on your current device, disable this option.
If this database is a restored database from a backup, it will be removed automatically after successful syncing. Other databases will stay as is.
Step 3: Sync to Cloud
- Capture URL: Leave the default or fill in the URL of your Capture instance.
- License: Depending on previous steps, it can happen you need to provide a valid license. You have to download this file from Capture and use it here or you can use the license of your local device if running Capture.Edge here. (See hint for more info)
- Leave other settings to their default.
- [OPTION] Custom Start Time: You can set a custom start time for the backup by disabling "Sync all data".
- Start: Click Start Syncing. The data will now move from the offline device directly to the cloud via your local device.
- I have Capture Edge locally on my device
- No Capture Edge installed here
Enable the checkbox Use CloudManager license.
Follow the steps in this scenario: I need to get a License file.
- Capture URL: The URL of the Capture Cloud instance. Default:
https://portal.captureplatform.com. - Path to Syncer executable: This is usually pre-filled.
- Alternative Syncer Port: Choose an unused port on your local device (e.g., 5011).
- Min Points to Sync: The minimum number of data points required to start a sync.
- Points Per Request: The number of data points to send in each batch. Default: 10,000.
- Convert data in case of type mismatch: Enable this if you encounter type mismatch errors during syncing.
- Extra debug logs: Enable to view detailed logs of the syncing process.
Scenario 2: Backup & Restore
Use this if: You are at the offline device (maybe with no internet), but you can connect to the device via a network connection (for example Ethernet, Wi‑Fi, LAN). You want to copy the data to your laptop now, so you can upload it later when you have internet access.
Step 1: Select Mode
On the Home Screen, click Syncing From Backup.
Step 2: Connect to the Offline Device / Machine��
You need to tell RetroCapture where the backup should be taken.
- Database Type: Choose
InfluxDborTimescaleDb(depending on your device). - Address: Enter the IP address of the offline device (e.g.
192.168.1.x) and the port (usually8086for Influx or5432for Timescale). - Username & Password: Enter the database credentials.
- License: Check the box Use License From Offline Target Device.
- Click Set Variables.
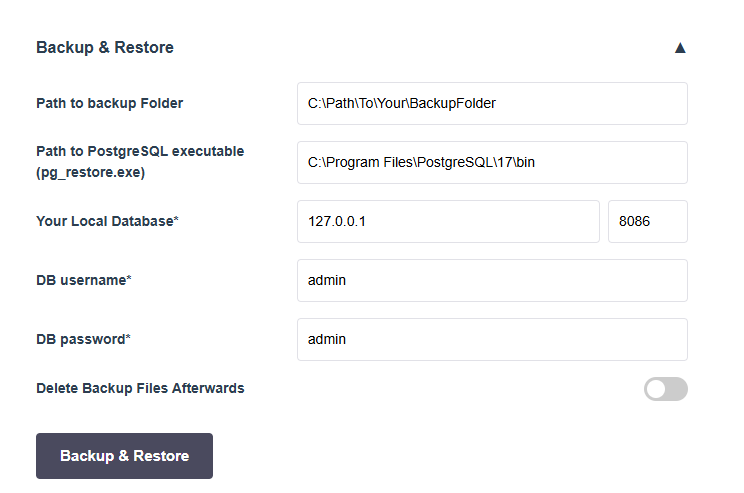
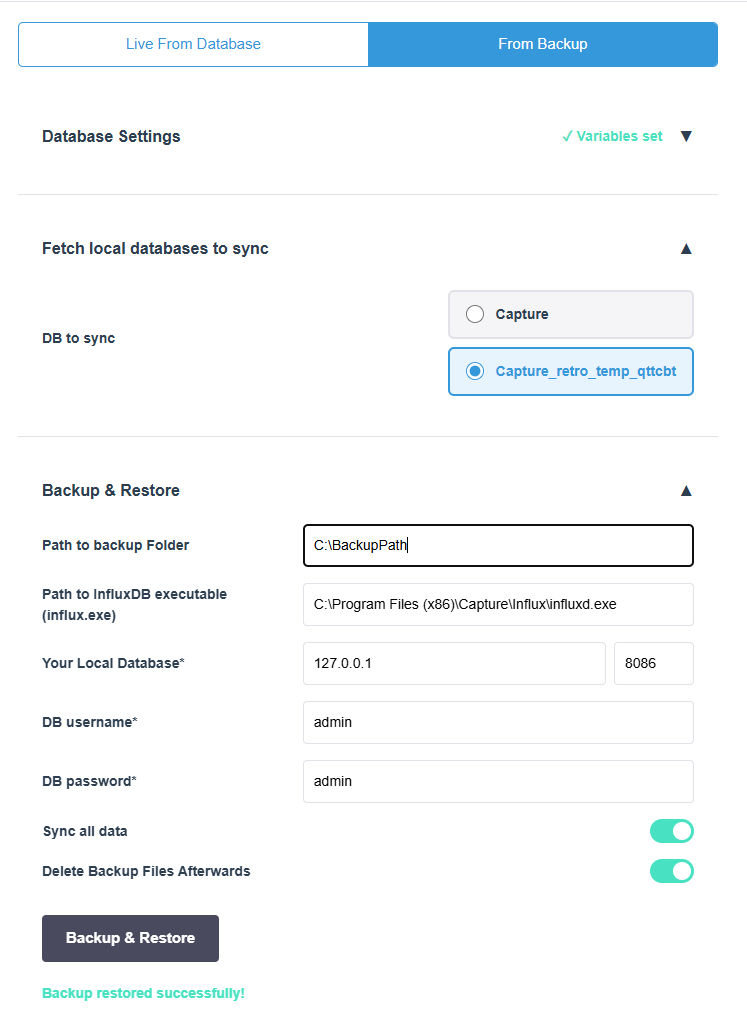
Step 2: Configure Backup
- Backup Path: Choose a folder on your computer where the file should be saved. We already suggest a temporary folder.
- Db Executable: This is the program that runs the database. If you installed Influx/Timescale via the tool, this is set correctly.
- Influx: Usually
C:\Program Files (x86)\Capture\Influx\influxd.exe. - Timescale: Usually
C:\Program Files\PostgreSQL\<version>\bin.
- Influx: Usually
- Local Database Address & Credentials: The settings for the database running on your local device (not the offline device). The address should be
127.0.0.1.
Step 3: Run Backup
Click Backup & Restore.
- The tool will copy the data from the device to your computer.
- Once finished, it will automatically "Restore" (load) that data into RetroCapture (= local database) so it's ready for upload.
You now have the data on your laptop. You can close the tool and go to an office with Internet. When you are ready to upload, see Scenario 1.
Scenario 3: Backup manually and upload it
Use this if: You cannot access the offline target device over local network / ethernet.
- Log in on the offline target device and run a backup command (See hint for more info)
- Ensure that you can copy these backups to your local device with RetroCapture (e.g. with a USB stick).
- Complete Scenario 2 in RetroCapture, but enable the checkbox
Already have a backup - Complete Scenario 1
Influx command: '<path-to-influxd.exe>' backup -portable -database <database> -host <host>:8088 [-retention <retention-policy>] [-since <ISO-8601-UTC>] "<backupPath>"
Timescale command: 'C:\Program Files\PostgreSQL\<version>\bin\pg_dump.exe' -h <host> -p <port> -U <user> -d <database> -F c -f "<C:\path\to\backup.dump>"
Generating a License
To upload data to the cloud, you need permission. This permission comes in the form of a License File.
New Frontend
-
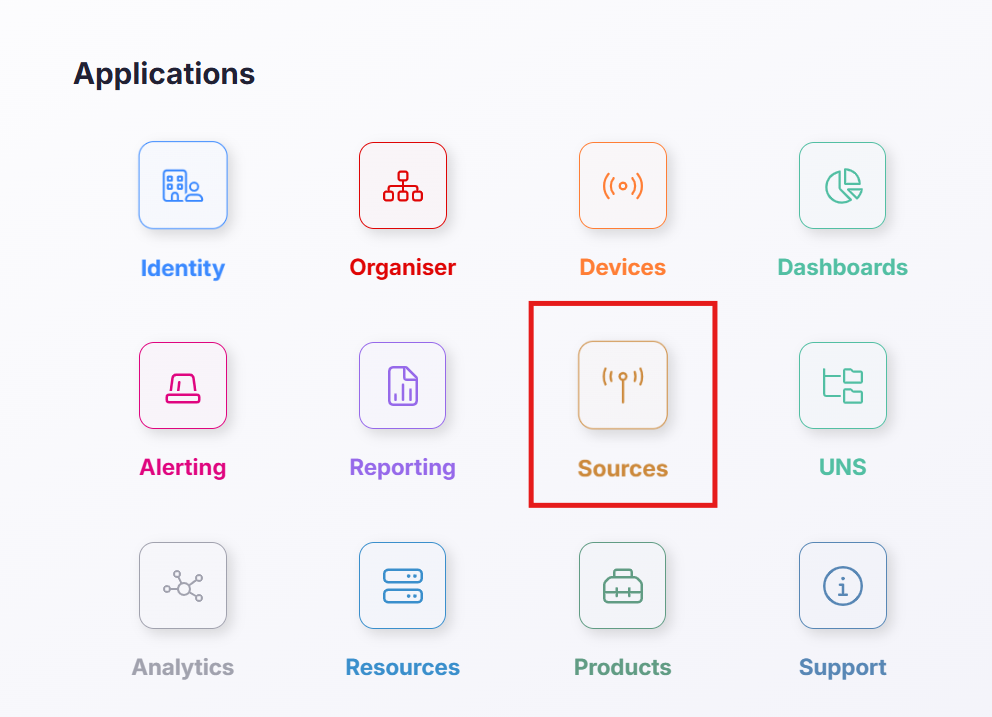
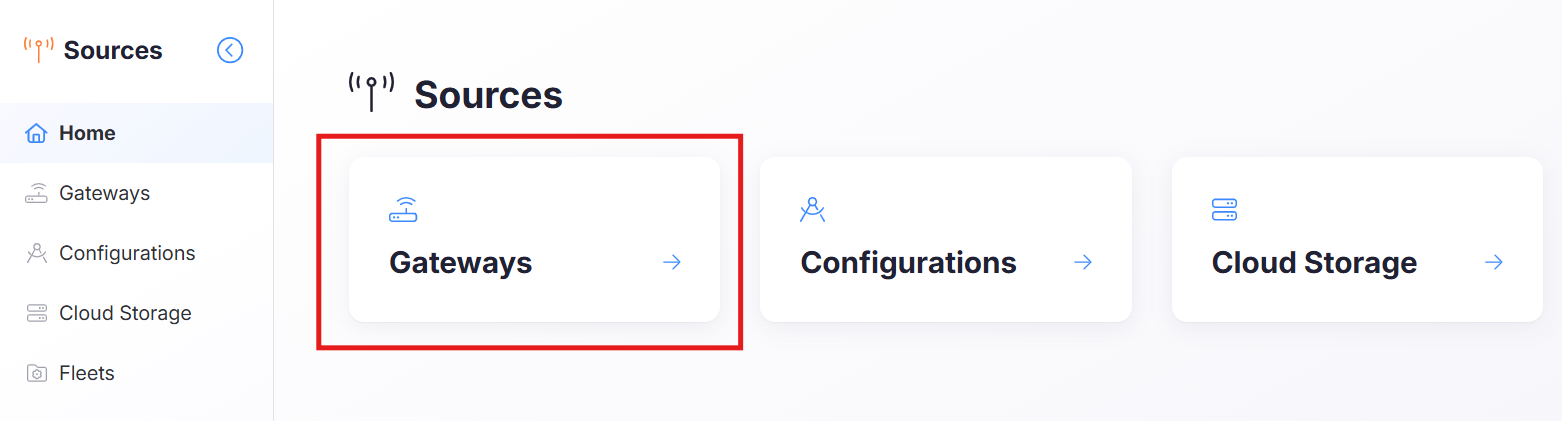
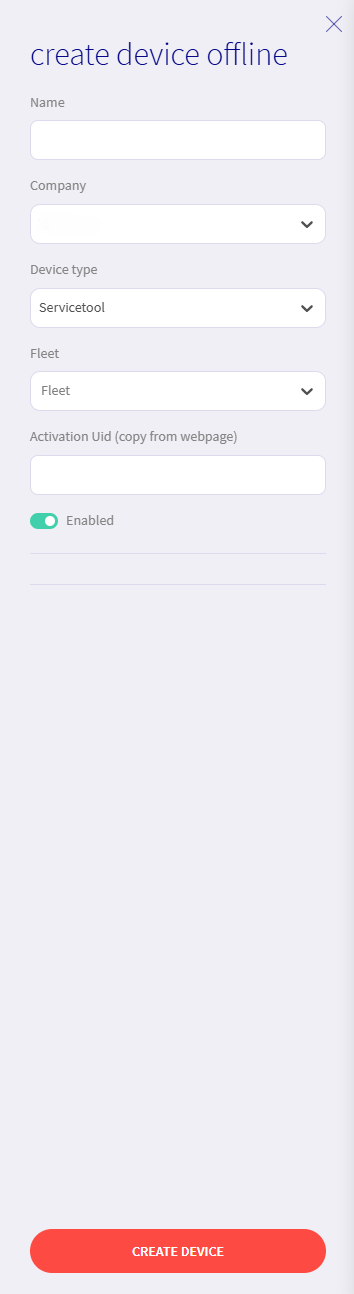
Navigate to the "Devices" page and click "Add Device".

-
Select "Add an offline device".

-
Fill in the device details.

-
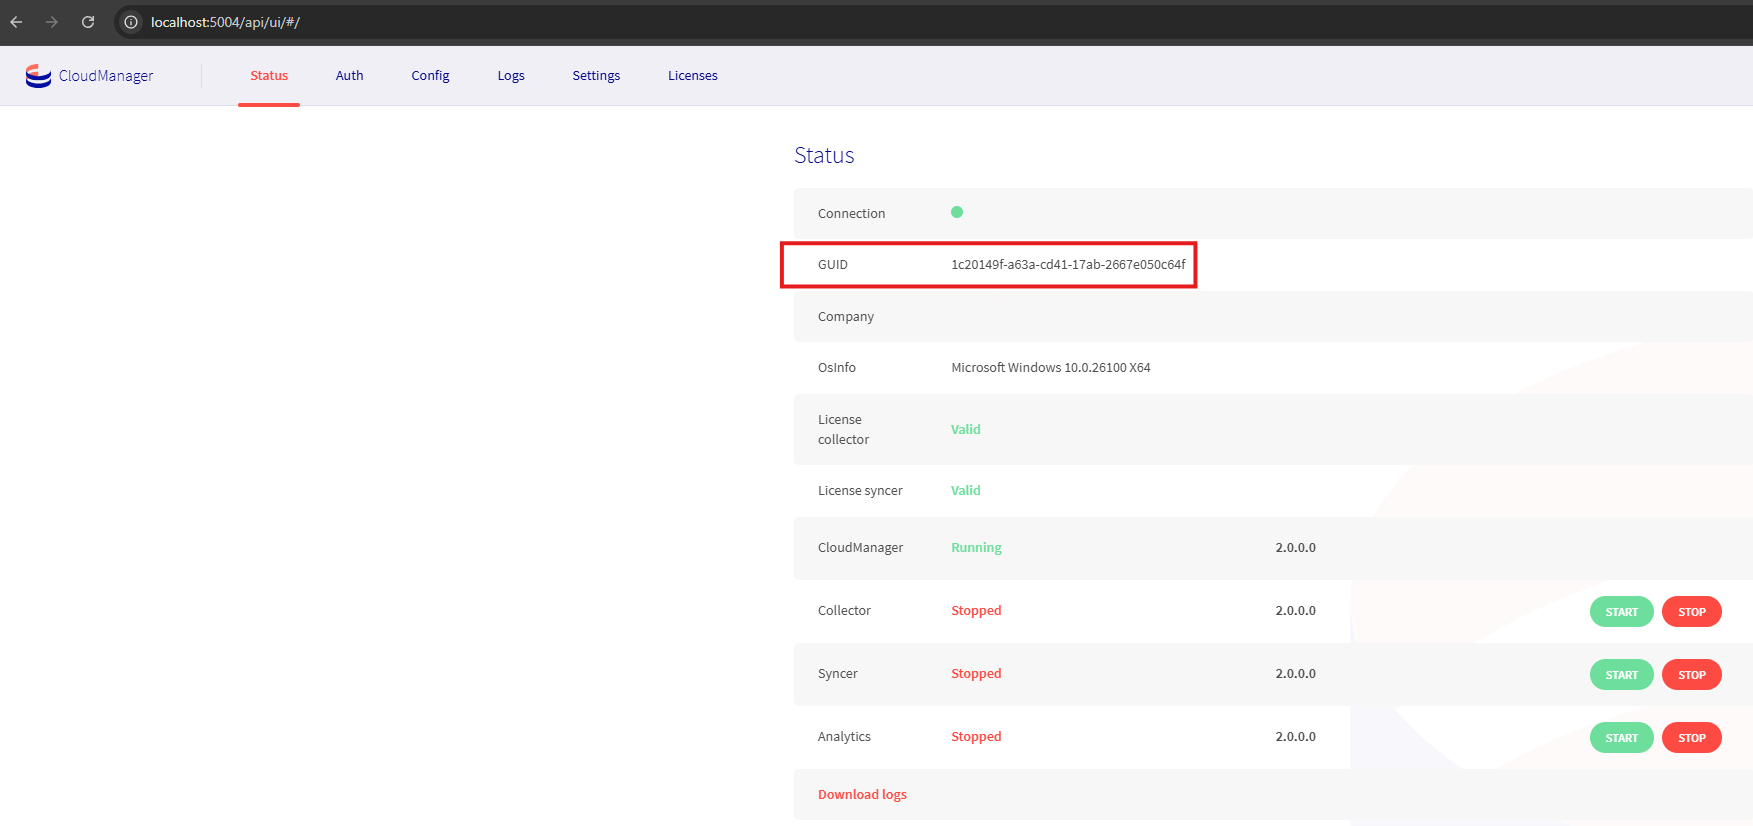
Find the CloudManager UI of the offline device (port 5004) and copy the displayed GUID.

-
Paste this GUID into the "Activation UID" field in Capture Cloud.
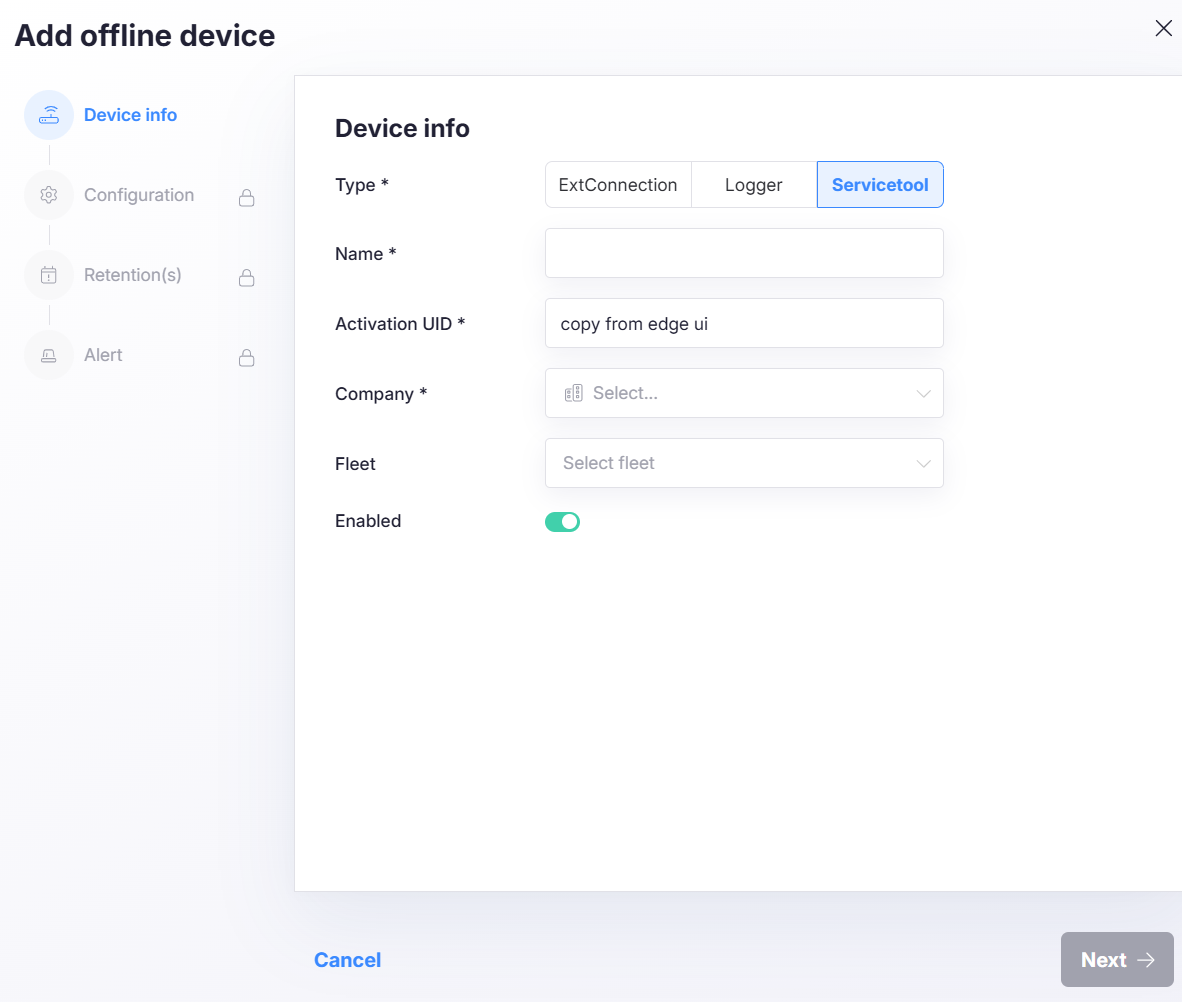
-
Download the license file.


Old Frontend
-
Go to the "Offline Devices" page.

-
If this is your first time, add an offline device.

-
Find the CloudManager UI of the offline device (port 5004) and copy the displayed GUID.
-
Paste this GUID into the "Activation UID" field.
-
Download the license.


Troubleshooting & Advanced
A known issue with InfluxDB is taking backups with our tool across Windows to Linux (or a container) and vice versa. Solution: create a backup manually on the device itself and copy the backup files to your device running RetroCapture. These backups can be used.
See this error:
2020/02/05 14:40:47 backing up db=mydb
2020/02/05 14:40:47 backing up db=mydb rp=my_rp shard=122 to backup_20200205_144047/mydb.my_rp.00122.00 since 2018-01-01T00:00:00Z
2020/02/05 14:40:47 Download shard 122 failed copy backup to file: err=<nil>, n=0.  Waiting 2s and retrying (0)...
2020/02/05 14:40:49 Download shard 122 failed copy backup to file: err=<nil>, n=0.  Waiting 2s and retrying (1)...
2020/02/05 14:40:52 Download shard 122 failed copy backup to file: err=<nil>, n=0.  Waiting 2s and retrying (2)...
2020/02/05 14:40:54 Download shard 122 failed copy backup to file: err=<nil>, n=0.  Waiting 2s and retrying (3)...
2020/02/05 14:44:44 error (copy backup to file: err=<nil>, n=0) when backing up db: mydb, rp my_rp, shard 122. continuing backup on remaining shards
2020/02/05 14:44:44 backup failed: copy backup to file: err=<nil>, n=0
backup: copy backup to file: err=<nil>, n=0
Solution: add bind-address = ":8088" to the file /etc/influxdb/influxdb.conf.
Download here (version 17 is recommended).